From Zero to Homelab: Run a Private Server on Your Raspberry Pi with Tailscale
From Zero to Homelab: Run a Private Server on Your Raspberry Pi with Tailscale
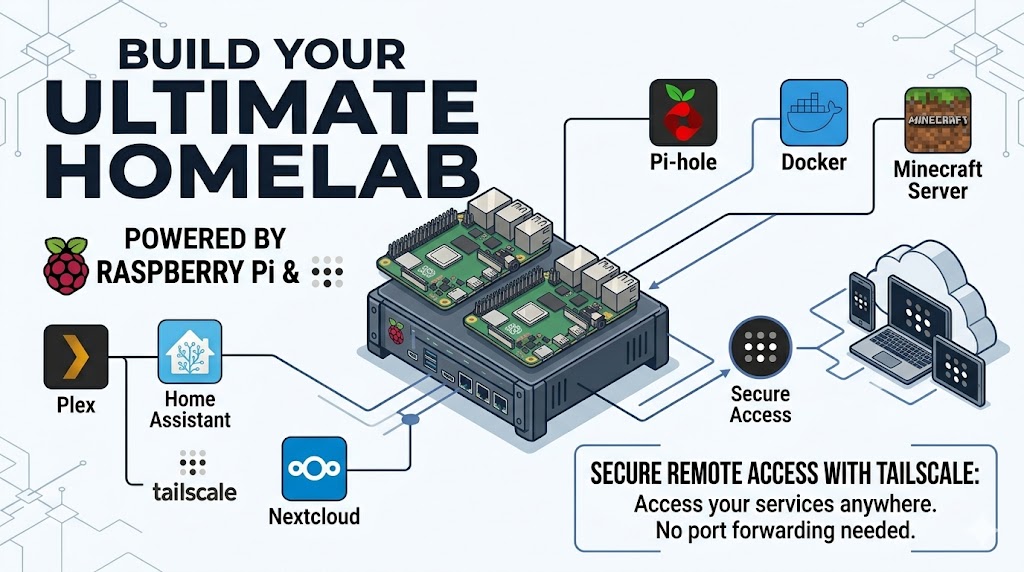
You have a Raspberry Pi gathering dust. You want a private home server accessible from anywhere, but secure. No port forwarding. No dynamic DNS. No exposing your home IP to the world.
Enter Tailscale: a zero-config VPN that creates a private network between your devices. Combine it with a Raspberry Pi, and you get a low‑power, always‑on homelab that you can SSH into from a coffee shop, access your self‑hosted apps from your phone, or share services with friends safely.
In this guide, I’ll show you how to set up your Raspberry Pi as a homelab server and connect to it remotely using Tailscale. Let’s get your Pi working for you.
What You’ll Need
- A Raspberry Pi (3B+, 4, or 5) with Raspberry Pi OS Lite or Raspberry Pi OS Desktop
- Power supply, microSD card (16+ GB), and an Ethernet cable (recommended) or stable Wi‑Fi
- A Tailscale account (free tier works great)
- Another device (laptop, phone) to test remote access
No static IP needed. Tailscale works through NATs and firewalls automatically.
Step 1: Get Your Raspberry Pi Ready If your Pi isn’t set up yet:
- Flash Raspberry Pi OS (Lite recommended for a server) using Raspberry Pi Imager.
- Enable SSH during imaging (click the gear icon → set username/password → enable SSH).
- Boot the Pi and find its local IP (check your router’s DHCP list or use ping raspberrypi.local). Connect via SSH:
ssh pi@raspberrypi.localUpdate the system:
sudo apt update && sudo apt upgrade -yNow your Pi is ready to become a server.
Step 2: Install Tailscale Tailscale is just a package away. Run this on your Pi:
curl -fsSL https://tailscale.com/install.sh | shThen start Tailscale and link it to your account:
sudo tailscale upIt will print a URL, open it in your browser, log in to Tailscale (or create an account), and authorize the device. That’s it! Your Pi is now part of your private Tailscale network. You can see it in the Tailscale admin console.
Step 3: Connect to Your Pi from Anywhere Install Tailscale on your laptop or phone (from tailscale.com/download). Log in with the same account. Now, instead of using the local IP, use the Pi’s Tailscale IP (something like 100.x.y.z) or its Tailscale hostname (e.g., raspberrypi). From your laptop:
ssh pi@100.x.y.zOr if you enabled MagicDNS (it’s on by default for new tailnets):
ssh pi@raspberrypiYou’re in. From anywhere with an internet connection. No firewall rules, no port forwarding.
Step 4: Turn Your Pi Into a Real Homelab Server Now the fun part, run services that you can access over Tailscale. Since Tailscale encrypts all traffic, you don’t need HTTPS for local services (but you can add it later).
Option A: Run Docker containers
Docker makes homelabbing easy. Install it:
curl -fsSL https://get.docker.com | sh
sudo usermod -aG docker $pi
Log out and back in, then try containers. For example, run a personal dashboard:
docker run -d --name homer -p 8080:8080 b4bz/homer:latestNow access it from any device on your Tailnet:
http://
Option B: Simple web server with Python
mkdir ~/mysite && cd ~/mysite
echo "<h1>Hello from my Pi homelab!</h1>" > index.html
python3 -m http.server 8000
Visit http://
Option C: Samba / file server
Want network storage? Install Samba and share a folder. Because you access it only over Tailscale, it’s not exposed to the public internet.
sudo apt install samba -y
sudo smbpasswd -a pi
Then edit /etc/samba/smb.conf and add:
[homelab]
   path = /home/pi/shared
   browseable = yes
   read only = no
   valid users = pi
Create the folder and restart Samba:
mkdir ~/shared
sudo systemctl restart smbd
From your laptop’s file manager, connect to \
Step 5: Make Services Even Easier to Reach (Optional) Use Tailscale’s Subnet Router
Want to access other devices on your home LAN without installing Tailscale on each one? On your Pi, enable subnet routing:
sudo tailscale up --advertise-routes=192.168.1.0/24Then approve the routes in the Tailscale admin console. Now from your laptop, you can use local IPs like 192.168.1.xx as if you were home. Run a Tailscale Exit Node
Turn your Pi into a VPN exit node. All your traffic (including to the public internet) can route through your home connection. Useful for accessing geo‑restricted content or securing public Wi‑Fi. Enable exit node:
sudo tailscale up --advertise-exit-nodeApprove it in the admin console, then on any device select “Use exit node” → your Pi.
Security Tips for Your Homelab
- Keep the Pi updated:
sudo apt update && sudo apt upgraderegularly. - Use strong SSH keys instead of passwords. Tailscale already secures the connection, but defense in depth is good.
- Disable password authentication in SSH for extra safety (after setting up SSH keys).
- Run containers as non‑root and use Tailscale’s ACLs to restrict who can access certain services.
Tailscale itself automatically handles encryption, key rotation, and identity, you get corporate‑grade security without the headache.
What Can You Run on a Pi Homelab?
- AdGuard Home (network‑wide ad blocking)
- Jellyfin (personal media streaming)
- Vaultwarden (password manager)
- Home Assistant (smart home hub)
- Gitea (private Git server)
- Uptime Kuma (monitoring)
- Nextcloud (self‑hosted cloud storage)
- MariaDB (database)
- NodeJS / Python / PHP (Web server)
- Anything you can run in a container
All accessible only to you and your Tailscale devices. No bots, no port scanners, no worry.
Troubleshooting
- Can’t SSH to the Pi over Tailscale?
- Make sure SSH is running on the Pi:
sudo systemctl status ssh. - Check that the Pi is online in the Tailscale admin console.
- Try pinging the Tailscale IP:
ping 100.x.y.z. If it fails, restart Tailscale:sudo tailscale down && sudo tailscale up.
- Make sure SSH is running on the Pi:
- Tailscale says “not connected” on Pi.
- Run
tailscale statusif it shows stopped, runsudo tailscale upagain. - Ensure your Pi has internet access (ping
google.com). Docker containers can’t be reached over Tailscale? - Bind them to
0.0.0.0(default) and ensure the Pi’s firewall doesn’t block ports. Tailscale doesn’t care about the host’s firewall, but the container ports must be exposed.
- Run
Wrapping Up
You’ve just turned a $35 Raspberry Pi into a private, always‑accessible homelab server. No cloud fees, no complex networking, no security anxiety. With Tailscale, everything is encrypted and only visible to you.
Now add more services, share access with a friend (using Tailscale’s ACLs), or set up automated backups. Your homelab grows as you do.
And best of all, it’s yours.
Go build something awesome. 🛡️
Need more ideas? Check out Awesome Selfhosted and Tailscale’s docs.